 Go to Polish version
GroupM Nexus Solutions – programmatic – Specification
Table of contents
- General principles
- Rules for creating advertising materials
- HTML5
- In-banner video
- Video Preroll
- Interstitial
- GroupM Nexus Solutions Sync
- GroupM Nexus Solutions Places
- Mobile
- Mobile Video
- Screenings – specification
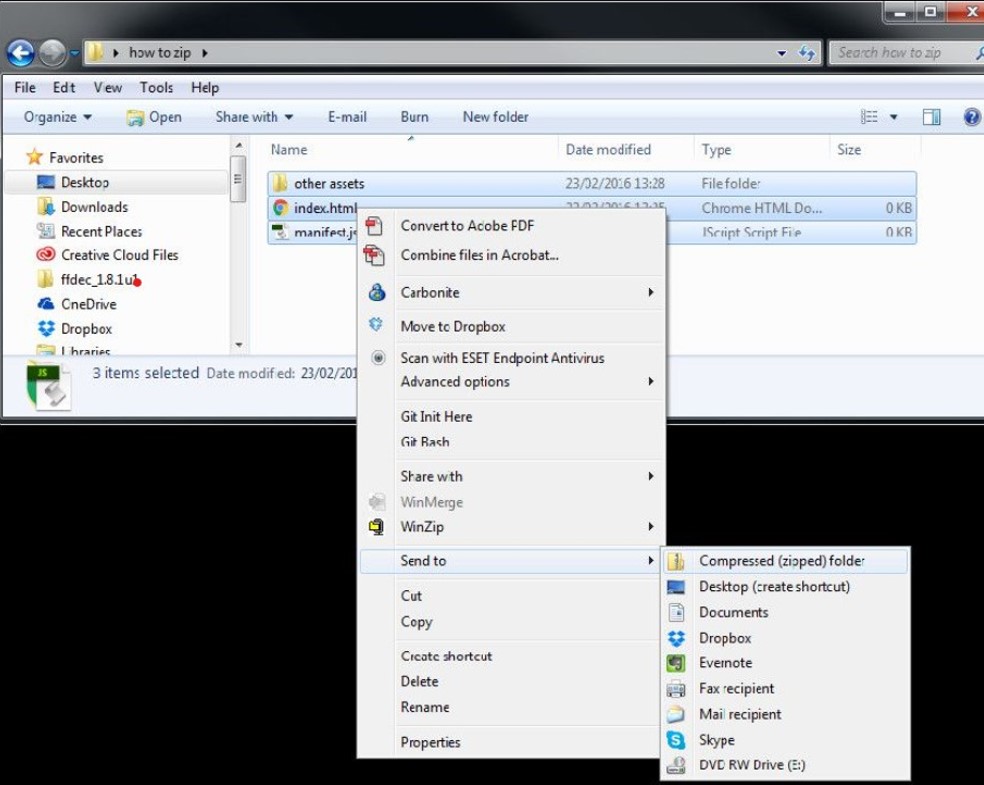
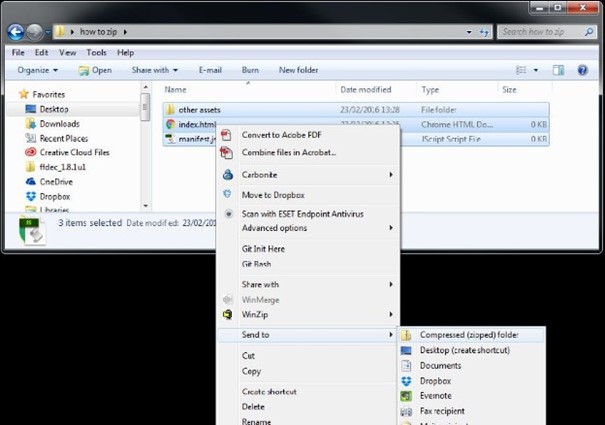
- Required Files Structure
- Adding clickTAG Variables
- Adding a clickTAG to a particular div
- Adding multiple clickTAGs
- Adding a clickTAG as an elements attribute
- Creating an inline clickTAG
- Using clickTAG with redirect
- Preload and States
- Public Methods
- Shared Events
- Event Tracking
- Transferring Variables in Query String
- Creatives with SVG
- M-Audio
- Integrated Video
- Interactive Tags
Before creating campaign materials is indicated to contact with GroupM Nexus Solutions media planner to agree on requirements for looping animated banners .
Complete advertising materials needed to run a campaign must be delivered at least 4 work days before campaign starts in order to verify them.. Materials should be compressed in Zip format.
With creatives we should be provided with hexadecimal background color for files. This can be ignored if the background is set to white ( #FFFFFF) , this also can be ignored if creative is a layer ( without html background, like brandmark, toplayer ). GroupM do not take responsibility in case of different creative look while this point was unkempt.
If campaign set up requires additional tracking codes, impression tracking code should be provide in IMG type.
DAlso all tracking codes (impression and clicks) need to be secure.
HTML5 and js emission codes are also accepted.
On all ads with partially black, white, or transparent backgrounds, you must add a visible border of a contrasting color to the majority background color of the creative.
-
- Ad formats : JPG, PNG, GIF and HTML5; Video Materials.
- Creative size:
- HTML5: up to 200kb (archive .zip with default image (static) );
- Static jpeg creatives and gif: up to 100kb.
- Ad dimensions:
-
- Package standard: 120×600 ; 160×600 ; 300×250 ; 750×100 ; 750×200 ; 728×90
- Package premium: 300×600 ;750×200 ; 750×300 ; 950×200 ; 950×300 ; 970×300
- Package premium + layer: 300×600 ;750×200 ; 750×300 ; 950×200 ; 950×300; 970×300 ; layer :1024×300 ; 950×300 ; 900×300 ; 750×550; 500×400
- Package Expand:: 300×250 -> 500×350, 300×600 -> 800×600, 750×200 -> 750×400
- Package VideoInBanner standard: 160×600 ; 300×250 ; 750×200 ;
- Package VideoInBanner premium: 300×600; 750×200; 750×300; 950×200; 950×300; 970×300
- Package Sync: 120×600; 160×600; 300×250; 728×90; 468×60; 336×280; 300×600; 320×50; 300×50; 216X36
- Package RTB: 120×600 ; 160×600 ; 300×250; 728×90
For RTB dedicated creatives , material cannot be looped , animation cannot be longer then 30 seconds and last frame must be static.
-
- If creative background was not set to blank, at bottom layer of document there should be a rectangle with dimensions of creative and with background color.
- Default Landing Page (click URL) should be delivered separately.
- The advertising medium must be framed with a frame (width 1px). The color must be in contrast to the colors used within the creative.
Warning
Creative of type layer , must have „zamknij X” button on top right corner with function onCrossClick. The „X” has to be at least 14×14 px . To „zamknij X” button the following function has to be assigned :
-
-
- In case of creative containing transparent areas it is forbidden to hide them with invisible buttons which capture clicks. Only visible elements of creative may redirect to client’s website.
- It is forbidden to create banners which load additional elements or stream external files
(exception :such action is allowed only when it was assumptioned ). - It is forbidden to use scripts which change browser window ( dimensions, place ) (exception: such action is allowed only when it was assumptioned ).
- It is forbidden to use scripts for tracking user interaction ( e-tuning ).
- Creatives and emission scripts which may cause errors or warning during displaying will be not accepted.
- Creative content must be consistent with landing page content.
-
-
Note!
Creations to be broadcast on Facebook, must be in accordance with the „Rules for advertising on Facebook” set out in a document available at https://www.facebook.com/ad_guidelines.php
- The maximum file size for a zipped Workspace is 200KB.
Each video object in the videos array requires two properties. You are limited to 8 video objects in a single ad.

The available methods for creating in-banner video ads are:
- Build an In-Banner Video Ad with Custom Elements .
Custom elements are HTML elements, provided by our HTML5 API, which can be used in your ad just like any normal HTML element. You place them in the HTML just as you would a <div> or <p>, and can target them with CSS and JavaScript in the same way.
<ft-carousel>;<ft-click>;<ft-default>;<ft-dynamic>;<ft-expand>;<ft-map>;<ft-photo>;<ft-richload>;<ft-slide>;<ft-slide-nav>;<ft-video>;<ft-video-controls>
- Your manifest should now look like this.Manifest.js with video array
FT.manifest({
„filename”:”index.html”,
„width”:300,
„height”:250,
„clickTagCount”:1,
„videos”:[
{„name”:”video1″, „ref”:”153357/Zoe_Beauty_Perfume”}
]
});
- Create a new index.html with a call to our HTML5API.
<!DOCTYPE html>
<html>
<head></head>
<body>
<script src=”our-latest-API”></script>
</body>
</html>
- Add an <ft-video> element . Index.html with HTML5 API and <ft-default>
<!DOCTYPE html><html>
<head></head>
<body><ft-default clicktag=”1″>
</ft-default><script src=”our-latest-API”></script>
</body></html>
- Add your <ft-video> element. The name attribute of the custom element must match the name attribute in the manifest.js. Include any video attributes (in this example we include autoplay, muted and controls in order to make the video autoplay with sound off, and display the controls). Index.html with HTML5 API, <ft-default> and <ft-video>
<!DOCTYPE html>
<html><head></head>
<body><ft-default clicktag=”1″>
<ft-video name=”video1″ autoplay muted controls></ft-video>
</ft-default><script src=”our-latest-API”></script>
</body></html>
NOTE: By default, videos do not automatically pause when a click tag is actioned. If this behavior is undesirable for your creative build, override it using the myFT event „clickthrough,” like this:
Index.html with code demonstrating cancel pause on clickthrough
<!DOCTYPE html>
<html>
<head></head>
<body>
<ft-default clicktag=”1″>
<ft-video id=”myVid” name=”video1″ autoplay muted controls></ft-video>
</ft-default>
<script src=”our-latest-API”></script>
<script>
var myVid = myFT.$(„#myVid”);
// Optional event handler that overrides video pause on click through
myFT.on(’clickthrough’, function(){
myVid[0].play();
});
</script>
</body>
</html>
- Add any other assets (e.g. images, fonts, stylesheets, etc.). Zip up your files, ensuring the index.html and the manifest.js are in the root of the zip.
2. Build an In-Banner VideoAd with JavaScript.
Your manifest.js should now look like this:
FT.manifest({
„filename”:”index.html”,
„width”:300,
„height”:250,
„clickTagCount”:1,
„videos”:[
{„name”:”video1″, „ref”:”153357/Zoe_Beauty_Perfume”}
]
});
- html with HTML5 API
<!DOCTYPE html><html>
<head></head><body>
<script src=”our-latest-API”></script>
</body></html>
- Add a container div. This will wrap your other content.
<!DOCTYPE html>
<html>
<head></head>
<body>
<div id=”container”>
</div><script src=”our-latest-API”></script></body>
</html>
- Add a div element within your container div for the video to be loaded into.
Index.html with HTML5 API and container and videoHolder divs.
<!DOCTYPE html>
<html>
<head></head>
<body>
<div id=”container”>
<div id=”videoHolder”></div>
</div><script src=”our-latest-API”></script>
</body>
</html>
- Below the HTML5 API call, add a script tag. Within the script tag, create a variable to reference your container element. Index.html with HTML5 API and JavaScript variables.
<!DOCTYPE html><html>
<head></head>
<body> <div id=”container”>
<div id=”videoHolder”></div>
</div> <script src=”our-latest-API”></script>
<script> var container = myFT.$(„#container”);
</script></body></html>
- Within the script tag, the clickTag() methodcan be used in a click handler to action the appropriate click tag.
<script>
var container = myFT.$(„#container”);
container.on(„click”, function() {
myFT.clickTag(1);
});
</script>
- Use the insertVideo() method to insert an <ft-video> custom element into the 'videoHolder’ div that was created previously. The return value of insertVideo() is a reference to the <ft-video> element which is assigned to a variable (’myVid’) for later use.
<script>
var container = myFT.$(„#container”);
container.on(„click”, function() {
myFT.clickTag(1);
});
var myVid = myFT.insertVideo({
video: „video1”,
parent: videoHolder,
autoplay: true,
controls: true,
muted: true,
width: 300,
height: 250
});
</script>
- The insertVideo() method takes a video configuration object as an argument. In this example we include autoplay, muted and controls in order to make the video autoplay with sound off, and display the controls.
Required properties of the configuration object:
video: Must match the name property of the video object as defined in the manifest.js file.
parent: DOM Element that the <ft-video> element will be appended to.
Optional properties:
autoplay: Determines if the video should autoplay. This defaults to false if not set.
controls: Determines if the video controls should be shown. This defaults to false if not set.
muted: Determines if the video should initially be muted. This defaults to false if not set.
width: Width of the <ft-video> element. Remove to use the native video width.
height: Height of the<ft-video> element. Remove to use the native video height.
NOTE: By default, videos do not automatically pause when a click tag is actioned. If this behavior is undesirable for your creative build, override it using the myFT event „clickthrough,” like this:
<script>
var container = myFT.$(„#container”);
container.on(„click”, function() {
myFT.clickTag(1);
});
// Optional event handler that overrides video pause on click through
myFT.on(’clickthrough’, function(){
myVid.play();
});
var myVid = myFT.insertVideo({
video: „video1”,
parent: videoHolder,
autoplay: true,
controls: false,
muted: true,
width: 300,
height: 250
});
</script>
- Your HTML file should now look like this.Index.html with HTML5 API and JavaScript.
<!DOCTYPE html>
<html>
<head></head>
<body><div id=”container”>
<div id=”videoHolder”></div>
</div><script src=”our-latest-API”></script>
<script>
var container = myFT.$(„#container”);
container.on(„click”, function() {
myFT.clickTag(1);
});
var myVid = myFT.insertVideo({
video: „video1”,
parent: videoHolder,
autoplay: true,
controls: false,
muted: true,
width: 300,
height: 250
});
</script>
</body> </html>
- Add any other assets (images, fonts, stylesheets, etc.). Zip up your files, ensuring the index.html and the manifest.js are in the root of the zip.
Downloadable Sample Files:
-
- Material must be delivered in following formats :
- mp4
- Accepted spot lenght : 10s, 15s, 20s oraz 30s.
- Technical requirements:
- weight : max 15 mb
- Codec video :
- mp4 : H.264 ( recommended ) acceptable : DivX, XviD, MPEG-4
- Codec audio :
- mp4 : ACC (recommended ) , acceptable : mp4a, mp3, AC3
- FPS : max 25 FPS
- audio level :
- nominal: -18 dBfs
- maximal: -6 dBfs
- the following parameters form the basis for most television and radio broadcasters in Europe, including Poland, and comply with the document issued by the European Broadcasting Union (EBU R 128 Standard).Integrated Loudness: -23.0 LUFS (± 0.5 LU) Tolerance: A maximum of ± 1.0 LUFS is allowed in exceptional cases, but ± 0.5 LU should be aimed for.True Peak: Maximum level: -1.0 dBTP Tolerance: No tolerance above -1.0 dBTP. Exceeding this level is unacceptable and can lead to clipping.
- Reference Table by Publisher.
Publisher / Platform Integrated Loudness True Peak Loudness Range (LRA) Standard / Notes Television (Poland/EU) -23.0 LUFS (± 0.5 LU) -1.0 dBTP 4-8 LU EBU R 128, KRRiT Radio (Poland/EU) -23.0 LUFS (± 0.5 LU) -1.0 dBTP 4-8 LU EBU R 128, KRRiT YouTube -14.0 to -16.0 LUFS -1.0 to -2.0 dBTP < 8 LU Platform normalization Facebook/Instagram/TikTok -16.0 to -18.0 LUFS -1.0 to -2.0 dBTP < 8 LU Platform normalization Spotify -14.0 to -16.0 LUFS -1.0 dBTP < 8 LU Platform normalization Apple Music/Tidal -16.0 to -18.0 LUFS -1.0 dBTP < 8 LU Platform normalization Netflix (if ads) -23.0 LUFS (or lower, per platform spec) -2.0 dBTP < 8 LU High quality standards, often ITU-R BS.1770-4/5
- Recommended to add subtitles to the materials
- Material must be delivered in following formats :
- Material must be delivered in following format :
- flv
- basic doublebillboard compatible with basic creative requirements (no video DBB)
- Accepted spot length : 10s
- Technical requirements:
- weight :max 2 mb
- Codec video :
- flv :H.264 (recommended) , acceptable: DivX, XviD, MPEG-4
- Codec audio :
- flv : ACC (recommended) , acceptable: mp4a, mp3, AC3
- FPS : max 25 FPS
- audio level :
- nominal: -18 dBfs
- maximal: -6 dBfs
GroupM Nexus Solutions Sync is a product that enables to synchronize the display campaign with tv campaign.
At least two weeks before the campaign starts, the tv spot should be delivered to GroupM Nexus Solution to assign it an individual marker. IMPORTANT: this should be the final version of the spot that is accepted for the TV campaign.
All display formats for the campaign should be delivered in jpeg format, up to 100kb each.
- 120×600
- 160×600
- 300×250
- 468×60
- 728×90
- 336×280
- 300×600
- 320×50 (for apps and m.sites))
- 300×50 (for apps and m.sites))
- 216X36 (for apps and m.sites))
Mobile formats for Places should have maximum weight of 100 kb.
Full list of sizes:
- 300×250
- 300×600
- 320×50
- 320×100
- 320×480
- 480×320
Mobile formats should have maximum weight of 100 kb:
Full list of sizes:
- 120×600
- 160×600
- 300×250
- 468×60
- 728×90
- 336×280
- 300×600
- 300×50 (for applications and m.sites)
- 320×50 (for applications and m.sites)
- Mobile Preroll
- Materials recommended:
- MP4:
- 30s
- 3MB
Materials materials compatible with our Video Preroll specification will be accepted
- Materials recommended:
- Mobile Rectangle Video
- Materials recommended:
- MP4:
- 30s
- 3MB
Materials materials compatible with our Video Preroll specification will be accepted.
- Materials recommended:
- Fullpage with Video
- Material must be delivered in following formats :
- MP4
- PSD file with a layer that indicates place of emission video, with Aspect Ratio 16:9 or 4:3.
- Accepted spot length: 30s
- Technical requirements:
- Video MP4: 4MB
- Graphic: 100 kB (weight of jpg: 100 kB (after export from PSD, which is required))
- Dimensions: 640 x 832
- Codec video :
- mp4: H.264 ( recommended ) acceptable : DivX, XviD, MPEG-4
- Codec audio :
- mp4: ACC (recommended ) , acceptable : mp4a, mp3, AC3
- Good practice:Closing ad button should be design at top-right or top-left corner.
- Material must be delivered in following formats :
-
Standard Banner
Required Files Structure
Tip: Create banners easier with Adform‘s HTML5 Studio. It automatically generates the manifest.json and other Adform-related files and allows you to test and preview your HTML5 banners effortlessly.When building banners with HTML5 technology, you should follow Adform’s specifications for HTML5 banners.
The Standard banner must consist of banner and the Wallpaper. The maximum weight of the package is 1MB and the size of a Wallpaper should be 1920×1080 px.
The delivery of 750×200 format banner by Client is a must. There is an option of delivering also format: 750×300 px.
Each HTML5 banner prepared for the Adform system should be archived as a ZIP file. This ZIP file contains:
- A metadata file called manifest.json. The manifest.json file defines banner parameters such as name, description, dimensions, events, click tags, and source. These parameters are parsed and registered in the Adform system once the banner’s ZIP file is uploaded to assets.
{
„version”: „1.0”, „title”: „750×200 Example Banner”,
„description”: „optional string”,”width” : „750”,
„height”: „200”,„events”: {
„enabled”: 1,
„list”: {
„1”: „myEventName1”,
„2”: „myEventName2”,
„3”: „myEventName3”
}
},„clicktags”: {
„clickTAG”: „https://www.test.com”,
„clickTAG2”: „http://www.adform.com”
},„source”: „yourbanner.html”
}Events for a banner could be enabled – 1 or disabled – 0. If you use custom events, please define them in an events list section on a manifest.json file. Your banner might contain multiple clickTAG instances. If so, please define all of them in a clickTAGs section on a manifest.json file.
- An HTML source file with the same name as defined in a manifest.json file. It is recommended to use only one HTML source per banner.
Important: A manifest.json file and a defined main HTML source should be located in a root directory of a ZIP file. Otherwise, the system will not be able to extract the zipped content correctly and you will receive an error on ZIP upload. Also, a total banner weight is measured when the content is unzipped.
- JavaScript sources like jQuery, GreenSock animation libraries and components, etc., if they are used in a banner. Libraries can be included as local assets or as external sources.
- Other assets like images, fonts, XML files, etc., that could be taken from local directories or from external paths.
- A metadata file called manifest.json. The manifest.json file defines banner parameters such as name, description, dimensions, events, click tags, and source. These parameters are parsed and registered in the Adform system once the banner’s ZIP file is uploaded to assets.
-
Adding clickTAG Variables
There are various methods how to add a clickTAG to an HTML5 banner. Below you will find examples how to add a clickTAG instance to some particular element in an HTML document, assign a clickTAG to some frame source, etc.
Note, that Adform.DHTML.js library should be added in HTML document’s header in all cases:
<script>
document.write('<script src=”’+ (window.API_URL || 'https://s1.adform.net/banners/scripts/rmb/Adform.DHTML.js?bv=’+ Math.random()) +'”><\/script>’);
</script> -
Adding a clickTAG to a particular div
Follow these steps to add a clickTAG to some particular div in an HTML5 banner:
- Set id (or class name) value for clickTAG area/layer:
<div class=”click-layer” id=”clickLayer”></div>
- Take this particular element by its id (or class name) and set the 'onclick’ function to it. Place this script somewhere below the element in the HTML document (to make sure the element is created earlier than the code is executed):
<script>
var clickArea = document.getElementById(’clickLayer’);clickTAGvalue = dhtml.getVar(’clickTAG’, 'http://www.example.com’);
landingpagetarget = dhtml.getVar(’landingPageTarget’, '_blank’);clickArea.onclick = function() {
window.open(clickTAGvalue,landingpagetarget);
}
</script>A click on a click layer area calls a function that opens a window with a clickTAG URL value inherited from the Adform system, or the fallback static URL. When a banner is uploaded to the system, getVar returns URL defined in the system next to asset. When a banner is being tested locally, a fallback URL is taken as if a clickTAG is 'null’ so far.
Cursor style for a clickTAG can be changed to a pointer by adding clickArea.style.cursor = „pointer”; to a click function. - Set id (or class name) value for clickTAG area/layer:
-
Adding multiple clickTAGs
If you need to have multiple clickTAGs on the same banner, do the following:
- Set id or (class name) for click elements:
<body>
<div id=”element”>
<div id=”linkbox”>
<a id=”left”>My Link1</a>
<a id=”center”>My Link2</a>
<a id=”right”>My Link3</a>
</div>
</div> - Define a clickTAG value for each clickTAG instance. Values should get landing page URLs from the Adform system (dhtml.getVar) once the banner is placed there or you may use some static value for local testing. Collect all clickTAG instance elements from HTML document by using getElementById or getElementsByClass methods. Set the 'onlick’ function to each element separately. Place this script somewhere below the click elements in the HTML document (to make sure the elements are created earlier than the code is executed):
<script>
clickTAGvalue = dhtml.getVar(’clickTAG’, 'http://www.adform.com’);
clickTAGvalue2 = dhtml.getVar(’clickTAG2′, 'http://html5toolkit.adform.com/’);
clickTAGvalue3 = dhtml.getVar(’clickTAG3′, 'http://site.adform.com/resources/creative-space/’);
landingpagetarget = dhtml.getVar(’landingPageTarget’, '_blank’);var center = document.getElementById(’center’);
var left = document.getElementById(’left’);
var right = document.getElementById(’right’);center.onclick = function() {
window.open(clickTAGvalue,landingpagetarget);
}left.onclick = function() {
window.open(clickTAGvalue2,landingpagetarget);
}right.onclick = function() {
window.open(clickTAGvalue3,landingpagetarget);
}
</script>A click on a particular click layer area calls a function that opens a window with an inherited particular clickTAG URL value from the Adform system or the particular fallback static URL (when testing locally). When a banner is uploaded to the system, getVar returns URL defined in the system next to asset. When a banner is being tested locally, a fallback URL is taken as if a clickTAG is 'null’ so far.
- Register multiple clickTAGs to manifest.json file before the banner is uploaded to system, e.g.,
{
„version”: „1.0”,”title”: „Banner-Sample-580×400”,
„description”: „”,”width” : „580”,
„height”: „400”,„events”: {
„enabled”: 1,
„list”: { }
},„clicktags”: {
„clickTAG”: „http://www.adform.com”,
„clickTAG2”: „http://html5toolkit.adform.com/”,
„clickTAG3”: „http://site.adform.com/resources/creative-space/”,
},„source”: „index.html”
}
- Set id or (class name) for click elements:
-
Adding a clickTAG as an elements attribute
You can set a clickTAG as <a> element’s 'href’ value. To do that, follow these steps:
- Set id (or class name) value to each <a> element. You may leave 'href’ values not yet defined here:
<div id=”links”>
<div class=”links-title”></div>
<a class=”link link-1″ id=”link-1″ target=”_blank”>My first link</a>
<a class=”link link-2″ id=”link-2″ target=”_blank”>My second link</a>
<a class=”link link-3″ id=”link-3″ target=”_blank”>My third link</a>
<a class=”link link-4″ id=”link-4″ target=”_blank”>My fourth link</a>
</div> - Below in the banner’s HTML code use this script to get a particular <a> element and set a href attribute for it. Each href attribute may inherit the clickTAG variable value from the Adform system or some static URL if the banner is being tested locally:
<script>
document.getElementById(’link-1′).setAttribute(’href’, dhtml.getVar(’clickTAG’, 'http://www.example-1.com’));
document.getElementById(’link-2′).setAttribute(’href’, dhtml.getVar(’clickTAG2′, 'http://www.example-2.com’));
document.getElementById(’link-3′).setAttribute(’href’, dhtml.getVar(’clickTAG3′, 'http://www.example-3.com’));
document.getElementById(’link-4′).setAttribute(’href’, dhtml.getVar(’clickTAG4′, 'http://www.example-4.com”’));
</script> - Register multiple clickTAGs to manifest.json file before the banner is uploaded to the system, e.g.,
{
„version”: „1.0”,”title”: „Banner-Sample-930×400”,
„description”: „”,”width” : „930”,
„height”: „180”,„events”: {
„enabled”: 1,
„list”: { }
},„clicktags”: {
„clickTAG”: „http://www.example-1.com”,
„clickTAG2”: „http://www.example-2.com”,
„clickTAG3”: „http://www.example-3.com”,
„clickTAG4”: „http://www.example-4.com”,
},„source”: „index.html”
} - Register multiple clickTAGs to manifest.json file before the banner is uploaded to the system, e.g.,
{
„version”: „1.0”,”title”: „Banner-Sample-930×400”,
„description”: „”,”width” : „930”,
„height”: „180”,„events”: {
„enabled”: 1,
„list”: { }
},„clicktags”: {
„clickTAG”: „http://www.example-1.com”,
„clickTAG2”: „http://www.example-2.com”,
„clickTAG3”: „http://www.example-3.com”,
„clickTAG4”: „http://www.example-4.com”,
},„source”: „index.html”
}
- Set id (or class name) value to each <a> element. You may leave 'href’ values not yet defined here:
-
Creating an inline clickTAG
You can create a clickTAG element and add a JavaScript click functionality directly inline. See samples below.
- How to create a clickable div with id „clicktagger” and a mouse pointer that changes on mouseover/mouseout events.
<div id=”clicktagger” onclick=”javascript:window.open(dhtml.getVar(’clickTAG’),’_blank’);”
onmouseover=”javascript:this.style.cursor=’pointer’;” onmouseout=”javascript:this.style.cursor=’auto’;”></div> - How to create a hyperlink element <a href=”>, set clickTAG variable value as href attribute, and append it to a document body.
<script>
window.onload = function() {
var link = document.createElement(’a’);
link.style.display = 'block’;
link.href = dhtml.getVar(’clickTAG’);
link.target = dhtml.getVar(’landingPageTarget’);
document.body.appendChild(link);
}
</script>
- How to create a clickable div with id „clicktagger” and a mouse pointer that changes on mouseover/mouseout events.
-
Using clickTAG with redirect
To dynamically redirect the clickTAG value to another landing page, use the ;cpdir= referrer. E.g.,
var redirect = 'http://www.example.com’;
var custom = ’;cpdir=’ + redirect;
window.open(clickTAG + custom, landingpagetarget);Note: The ;cpdir= referrer will not work while testing locally or in HTML5 Studio environment. The creative must be served through the platform for this kind of redirect to function properly. -
Preload-and-States
Even if the HTML asset is not visible, it will be preloaded in the background after the page load. This will help, e.g., to avoid blinking on expand action in double file expanding banner.
Restart animation is no longer supported in an HTML asset, so you should add, stop or remove unwanted content depending on asset state by yourself. An HTML asset has 3 states: initial, visible, and hidden. You can get the current state of the asset using dhtml.getState() or listen for state change events through dhtml.sharedEvents.
Example:
var state = dhtml.getState();console.log(’The current state is: ’ + state);
dhtml.sharedEvents.on(’changed:state’, function (s) {
console.log(’Last state was: ’ + state);
console.log(’State has changed to: ’ + s);
state = s;
}); -
Public Methods
Public methods are for assets:
- dhtml.getVar(name, undefined_fallback) – returns string value of a banner variable with name (flashvars) or provided default value if variable does not exist. To get values of clickTAG and landingPageTarget variables from the system if variables are not present, use default expression:
clickTAGvalue = dhtml.getVar(’clickTAG’, 'http://test.page.com/’);
landingPageTarget = dhtml.getVar(’landingPageTarget’, '_blank’); - dhtml.sendEvent(id, name, vars) – registers an event in the Adform system. If sending custom event id must be in the range from 1 to 19, name argument is required and vars object is optional. vars object example: { bv1: 'John’, bv2: 'Malcolm’ }
button.onclick = function() {
var id = 1,
name = 'banner click’,
eventVars = {
bv1: „John”,
bv2: „Colin”,
bv3: „24”
};dhtml.sendEvent(id, name, eventVars);
return false;
}; - dhtml.getAsset(id) – returns URL of an asset with the given id, or 'undefined’ if that asset does not exist.
var url = dhtml.getAsset(1); //A call to the function with the asset id.
- dhtml.inscreen – use this object to track banner in-screen parameters from the asset.
Methods:- on(type, callback) – adds an event listener.
- once(type, callback) – adds an event listener and removes him after the event fires.
- off(type, callback) – removes the event listener.
Events:
- ’visible’ – fires when banner’s visible parameter changes.
- ’percent’ – fires when banner’s percent parameter changes.
- ’change’ – fires when banner’s any parameter changes.
Every event (except 'change’) passes value argument to its callback. This argument holds the latest value of banner’s in-screen parameter.Properties:
- visible (Boolean) – holds value whenever banner is visible or not (true or false).
- percent (Number) – holds banner visibility percent value (from 0 to 100).
Code examples:
dhtml.inscreen
.on(’visible’, function (value) { console.log(’visible change’, value); })
.on(’percent’, function (value) { console.log(’percent change’, value); })
.on(’change’, function () {
console.log(’some change’, {
visible: this.visible,
percent: this.percent
});
});dhtml.external
- expand() – expands banner from asset (used in expandable banner types)
- close() – collapses or closes floating banner
- superClose() – closes and destroys the entire banner
- initPoliteMode() – announces that asset is ready to load heavy content (used with dhtml.sharedEvents.on(’pageLoadComplete’, listener))
- updateBox(x, y, width, height) – used by Adform.SingleExpanding
- expandComplete() – is used by Adform.SingleExpanding
- collapseComplete() – is used by Adform.SingleExpanding
- initScroll() – is used by Adform.FilmStrip
- initSingleExpanding(x, y) – is used by Adform.SingleExpanding
- toggleFullScreen(status) – is used by Adform.VideoPlayer
This method is for an interactive banner:
- includeAPI() – a method that loads Adform.DHTML.js file from the appropriate Adform servers. All it does is just adds a document writing script, e.g.,
doc.write('<script src=”’+fv.staticDomain + 'scripts/rmb/Adform.DHTML.js?bv=’+ fv.bv+'”><\/script>’);
- dhtml.getVar(name, undefined_fallback) – returns string value of a banner variable with name (flashvars) or provided default value if variable does not exist. To get values of clickTAG and landingPageTarget variables from the system if variables are not present, use default expression:
-
Event Tracking
Adform’s Event tracking can be applied to different types of user interactions: clicks on specific HTML banner areas, mouseovers, etc.
- The HTML asset should contain a manifest.json file and an HTML file zipped together with images, scripts, and other material.
- The manifest.json file must contain information about events used in the banner:
{ „version”: „1.0”,
„title”: „980×400 standard html”,
„description”: „”,„width” : „980”,
„height”: „400”,„events”: {
„enabled”: 1, // events capable
„list”: { // events list {id}: {eventName}
„1”: „myEventName1”,
„2”: „myEventName2”,
„3”: „myEventName3”
}
},„clicktags”: { „clickTAG”: „http://www.adform.com” },
„source”: „980×400.html”
} - 3. The HTML file should include an Adform HTML library which enables the banner to receive a clickTAG variable:
<script>
document.write('<script src=”’+ (window.API_URL || 'https://s1.adform.net/banners/scripts/rmb/Adform.DHTML.js?bv=’+ Math.random()) +'”><\/script>’);
</script>
Events with static values
Include in HTML file event calls on specific events which you want to track:
dhtml.sendEvent(event_id, event_name);- event_id – a whole number between 1 and 20 which represents a unique event in the banner. Reserved banner events IDs can be found here.
- event_name – static string (do not use dynamic values).
An example of a static event call:
dhtml.sendEvent(’1′, 'banner click’);Events with dynamic values
Include in HTML file event calls on specific events which you want to track:
dhtml.sendEvent(event_id, event_name, eventVars);- event_id – a whole number between 1 and 20 which represents a unique event in the banner. Reserved banner events IDs can be found here.
- event_name – static string (do not use dynamic values).
- eventVars – custom variable which should be assigned to a current event. Variable names are limited to the following: bv1, bv2, …, bv100. Their values should be of „String” type.
An example of eventVars:
event.onclick = function() {
var id = 1,
name = 'banner click’,
eventVars = {
bv1: „John”,
bv2: „Colin”,
bv3: „24”
};An example of dynamic event call:
dhtml.sendEvent(’1′, 'banner click’, eventVars); -
Transferring Variables in Query String
Transferring variables to the query string is often desired when a user inputs some data interactively in a banner, e.g., e-mail address, telephone number, location. This can be achieved by appending „;urlappend=” parameter to a clickTAG. The method of transferring these variables in the query string is described in the example below.
Using ;urlappend= in query string valuesJavaScript code:
var custom = ’;urlappend=’+’?street=’+street+’&country=’+country+’&city=’+city+’&zip=’+zip;window.open(clickTAG + custom, landingpagetarget);
If the clickTAG is, for example, set to http://www.site.com?Destination=, the user gets redirected to http://www.site.com?Destination=London when the banner is clicked.
Note: Variables in the query string cannot be tested in a banner’s preview page. All query string variables will be passed on to the final landing page only when the banner is uploaded to campaign in the Adform system and published. -
Creatives with SVG
Some extra attention should be paid to the banners that have inline SVG (Scalable Vector Graphics) images or animations. Such creatives might use the hashtag (#) references to point to some other element defined in the same HTML document. Typically, such references are used when defining a <mask>, <clip-path>, <use>, etc. When testing this kind of creative locally, there should not be any issues. But when it comes to serving the banner in Adform, or even testing it in the HTML5 Studio environment, a Cross-Origin Resource Sharing (CORS) policy might forbid such information exchange between the elements. That’s because when serving in Adform, the creative is being placed in its own document (iframe) and in most cases, the location (src) of that iframe is not exactly the same as the location of the web page itself.
In order to avoid the CORS errors, we might need to modify the “#” pointers so that that they would include the iframe’s location (defined in “src” attribute) at the beginning. For example,
<use xmlns:xlink=”http://www.w3.org/1999/xlink” xlink:href=”#Layer1_Fill”></use>
would become
<use xmlns:xlink=”http://www.w3.org/1999/xlink” xlink:href=”about:srcdoc#Layer1_Fill”></use>
Note: Since usually the „#” references are hard-coded inside either HTML or CSS parts of the creative, we need to dynamically grab the location of the iframe document and place it before the references with the help of JavaScript.Rewriting CSS styles
The following JavaScript snippet could help when CSS clip-path is used in SVG:
<script>
//grab the location of the document (iframe)
var loc = location.href.split(’#’)[0];
var newStyle = ”;//populate the new CSS stylesheet. Selectors and names should be changed accordingly.newStyle += ’.element1_class {clip-path: url(„’ + loc + '#someClipPath”) !important; }’;
newStyle += ’.element2_class {clip-path: url(„’ + loc + '#someClipPath”) !important; }’;
//…//add the stylesheet to <head> of the document
addCSS(newStyle);function addCSS(css, doc) {
doc = typeof doc !== 'undefined’ ? doc : document;
style = doc.createElement(’style’);
if (style.styleSheet) {
style.styleSheet.cssText = css;
} else {
style.appendChild(doc.createTextNode(css));
doc.getElementsByTagName(’head’)[0].appendChild(style);
}
}
</script>Here is an example of a 'Rewriting CSS styles’ method. Download 300x300px.
Changing „fill” attribute
Follow this example when you need to change „fill” URL references:
<script>
//grab the location of the document (iframe)
var loc = location.href.split(’#’)[0];var rects = document.getElementsByTagName(’rect’); //all <rect> tag elements
var rectsWithFill = []; //all <rect> elements that has „fill” attribute
var fills = [];for (var i = 0; i < rects.length; i++){
if (rects[i].hasAttribute(’fill’)){
rectsWithFill.push(rects[i]);
}
}for (var j = 0; j < rectsWithFill.length; j++){
fills.push(rectsWithFill[j].getAttribute(’fill’).split('(’)[1].split(’)’)[0]);
}//function to change all fill url references
function changeFill(el, prefix) {
for (var i = 0; i < el.length; i++){
document.querySelector('[*|fill=”url(’ + el[i] + ’)”]’).setAttribute(’fill’, 'url(’ + prefix + el[i] + ’)’);
}
}changeFill(fills, loc);
</script>
Changing “xlink:href” attribute
When it comes to errors in using the <use> SVG tag, the following snippet might help:
<script>
//grab the location of the document (iframe)
var loc = location.href.split(’#’)[0];//reference names should be changed accordingly.
changeHREF(’#Ref_1′, loc);
changeHREF(’#Ref_2′, loc);
//…function changeHREF(el, prefix) {document.querySelector('[*|href=”’ + el + '”]’).setAttribute(’xlink:href’, prefix + el);
}
</script>
The customer should provide files, that meet the following conditions:
- Audio files
- formats: MPEG Audio Layer 3 and Ogg Vorbis (Both required)
- maximum weight: 1 MB
- length: 15 or 30 seconds
- bitrate: from 128 to 320 kb/s (192kb/s recommended)
- samplerate: 44,1 kHz
- integrated loudness: -23LUFS
- Graphic file (required with the M-Audio Premium package)
- the graphics are clickable, but the pageviews are not included
- size: 300x250px or 750x200px – for Ogg only 300x250px
- weight: 40kb
- YT Technical specification: https://support.google.com/youtube/answer/4603579?hl=en
- Length: 6, 15 albo 30 sek.
- The video on YT must be embedded from the client’s public YT account – We should receive a link with the video posted on YT.
- Non YT specification: https://techspec.groupminteraction.pl/nexus-specyfikacja-en/#Video-Preroll
- Client can measure campaigns in CM because Google blocks other measuring systems. The second solution is to accounts after GroupM Nexus Solution statistics (i.e. with DV360)
- Clients tags must be attached to the full views
- after the campaign is over, GroupM Nexus Solutions sends back summary statistics for YT and nonYT video.
- Creative size: static up to 100kb.
- Basic package ad dimensions: 300×250, 300×600, 750×200, 750×300
- Up to 4 tags are added to the creative. List of requirements:
- sending a target link to each tag
- the string that will appear when you hover over the tag (up to 40 characters)
- Creatives and tracking codes are accepted. Emission tags aren’t accpeted.